Overview grid layout

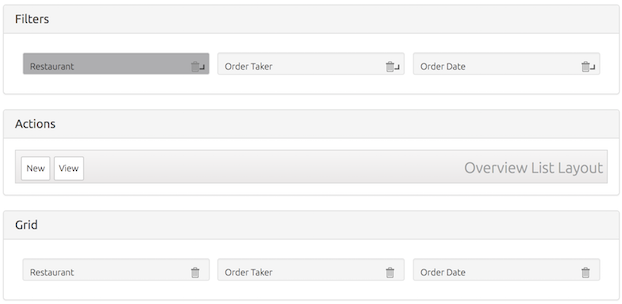
The overview grid layout has three sections:
- Filter section, containing the filter fields.
- Toolbar section, containing the bulk actions users can apply.
- Grid section, containing the fields that users can see in the layout (depending on the permissions).
Creating a new overview grid Layout
Please take the following steps to an overview grid layout:
- Go to Settings.

- Click on Layouts

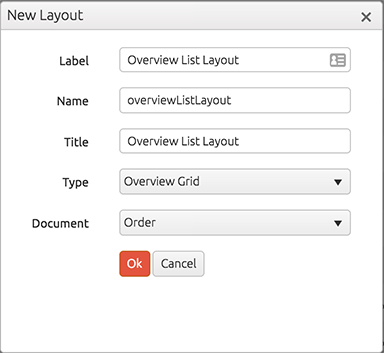
- Click on New, the New Layout modal opens.

- The window that shows up has 5 fields: the Label, Name, Title, Type and Document.
- Give the layout a label, a name, and a title. Select the Overview Grid type.
- Select the document definition you want to create an overview grid layout for.
- By clicking the Ok
 button, the layout will be created.
Adding a field to the overview grid layout
Please take the following steps to add filters or fields to the layout:
- Select a field from the tree-view on the left-hand side.
- Drag and Drop the field into the Filters section for creating a filter or into the Grid section for creating a column for the overview grid.
- A filter field can have three different sizes. To resize the filterfield, drag the field from the bottom-left corner.
- To remove a field or filter, click the Trashcan
 icon.
icon. - When you are done editing, click the Save
 button, the overview list layout will be persisted.
Note: Note that filters will always be rendered according to the smallest filter you created. E.g. if the filter on row 1 spans the complete width of the layout, while the second row contains two filters, the filter on row 1 will also be resized and aligned in accordance with the filters on row 2.
Note: The width of a field in the grid can be set in the _Field properties_.
Fields available for filtering
In the library for filter fields you can find the fields available for filtering. These field are:
| Field name | Available for Filtering |
|---|---|
| Text | Yes |
| Number | Yes |
| Date | Yes |
| Time | Yes |
| Yes | |
| Checkbox | Yes |
| Reference | Yes |
| Formula | Yes |
| Status | Yes, this is a special field |
| Last Modified On | Yes, this is a special field |
| Created On | Yes, this is a special field |
| Picklist | Yes |
| Attachment | No |
| QR | No |
| Geolocation | No |
| Signature | No |
| Autocomplete | Yes |
| Chat | No |
Adding bulk actions to the overview grid layout
Only bulk actions can be added to an overview grid layout:
- To add a bulk action to the layout, drag and drop the action into the Actions section.
- Within the toolbar actions can also be rearranged by drag-and-drop.
- To remove an action from the toolbar, click the Trashcan
 icon.
icon.
Changing field properties

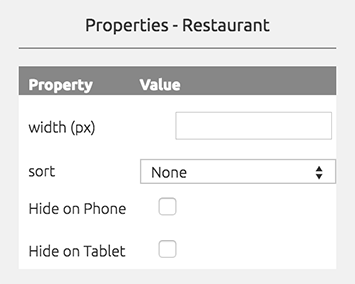
You can set a predefined Sorting order by clicking a field. A section will open in the right-hand side. The sorting order can be edited by choosing either Ascending or Descending from the dropdown. Users can change te sorting order by clicking the column headers. The new sorting will be persisted, except for reference field columns.
The width of a Grid field can be set by entering a value under Width.
For setting other field values you can refer to this section.
Source edit (JSON)
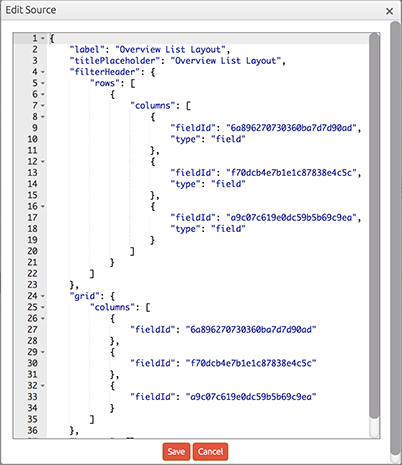
It's possible to change or create layouts by editing the source code of the layout:
- Click Edit Source to open the JSON editor.

- You can now add or change a fieldId in the source.
- Click Save to save the JSON and render the result in the layout editor.
Note: The JSON editor validates the JSON to ensure the layout doesn't break. Furthermore, it's not possible to add fields that are not part of the selected document definition.
Selecting items in an overview grid
You can use multiple methods to select a desired item in overview grid:
- You can use regular click on each item
- You can navigate through the grid using arrow up and arrow down keys
Moreover, it is possible to use multiple selection to perform different actions.
In each grid you can see a table header which allows you to select all the items from the grid if you click on the leftmost check-box. Also, you can select one of the column header to order your items.